


If you work out at home or outdoors or travel frequently I recommend making yourself a suspension trainer; a pair of handles or loops on ropes or webbing which can be used to perform a variety of bodyweight exercises like chin ups, rows, and inverted curls when there are no bars or suitable handholds to hang from. They’re lightweight and take up little space in your suitcase, back pack, or car trunk, and they can be quickly and securely anchored between a door and door frame, looped over a bar or an exposed beam or joist, or clipped to an eye bolt securely fastened to a load bearing structure. They can also be looped under the feet or anchored to the ground or a post and used for a variety of isometric exercises or to assist with balance during exercises like bodyweight squats.
A variety of commercial suspension trainers are available, but most are ridiculously overpriced considering how inexpensive the materials are and how easy they are to construct. The popular TRX home suspension training kit costs $200 and many competing brands cost over $100, but you can easily build your own in a few minutes for around $20 using common materials available at any home improvement store and a few basic tools.
The design I describe here cost me less than twenty dollars and only took a few minutes to make.
This could mean a savings of several hundreds of dollars for a gym or personal training studio planning to install multiple suspension training stations if they make them themselves.
Materials
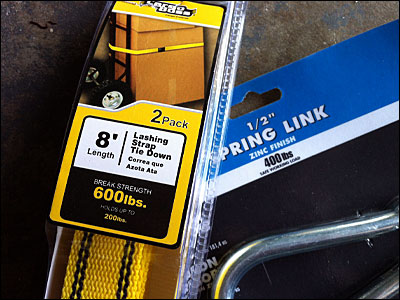
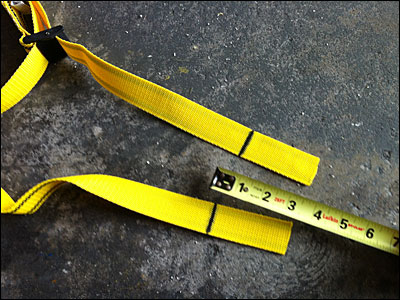
Suspension trainers are typically made with nylon webbing, plastic buckles, and foam covered PVC handles. You can buy a pair of tie down straps made of strong webbing with plastic buckles at home improvement stores for around seven or eight dollars, and a two foot length of three quarters or one inch schedule 40 PVC will cost you a little over a dollar.
If you plan to hang them from a chinning bar or power rack frame one pair of eight foot straps is enough. If you plan to hang them from an overhead beam or anchor them to the top of a door frame you will need to buy another pair of straps for extra length.
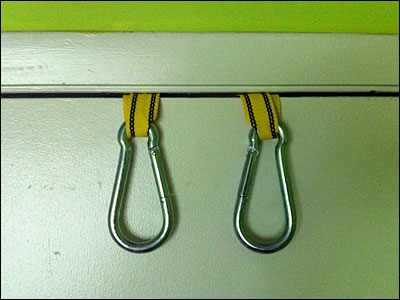
Spring clips can be used to prevent the straps from slipping when anchored between a door and the top of a door frame (use them with the clips on the side of the door facing the outside of the frame) or to clip them to eye bolts you can fasten to a beam or joist or to allow you to quickly clip them to a bar.
The webbing I bought was rated to hold up to two hundred pounds and the spring clips were rated for double that, so the pair of straps can handle well over my body weight. Always check the strength before buying anything you plan to hang from or support your body weight on, and err on the strong side with both materials and design.
If you can’t find straps like these at your local home improvement store you can get both heavy duty webbing and plastic hardware at Strap Works very inexpensively (one inch webbing with a breaking strength of over three thousand pounds is only $0.45 per foot)
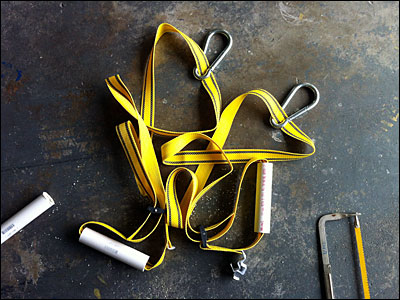
I bought one inch schedule 40 PVC, which has an outer diameter of around one and a quarter inch. If you plan to put cushioned grips on yours buy the three quarter inch PVC, which has an outer diameter of a little over an inch because the cushioned grip will add around another quarter inch to the diameter. For a cushioned grip, buy a 1×12 padded grip from an exercise equipment parts supplier like Full Circle Padding, cut off the end, and cut it into two six inch pieces to cover the handles.
The set I made included a single pair of straps ($6.97), a two foot section of one inch, schedule 40 PVC ($1.80) and two half inch spring clips ($4.64 each) for a total cost of $18.71, which is a savings of over $180 compared to the TRX.
If you don’t need the spring clips the total cost is only $9.43. If you get an extra pair of straps for more length and a twelve inch padded grip from Full Circle Padding ($5.75 plus shipping) would bring the total up to the mid thirties, which is still a very reasonable price.
Tools
All you need is something to cut the PVC and some sandpaper to smooth the edges and rough up the surface to improve grip if you aren’t going to add padded grips. If you are adding padded grips you’ll also need a scissors to cut them with.
I used a hacksaw and a miter box to keep the cuts reasonably straight. If you don’t have a saw or pipe cutter and don’t want to buy one you should be able to find someone at your home improvement store to cut the handles for you.
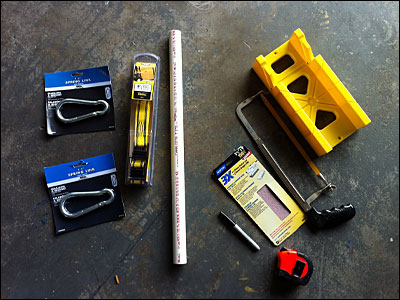
You will need a tape measure and a sharpie to mark the cuts on the PVC and grips and mark lengths on the webbing so you can adjust both straps to equal lengths.
Construction
Measure and mark off two six inch lengths on your PVC. If you are adding a padded grip cut the end off and mark off two equal lengths (the halfway point if you purchased a twelve inch grip). Double check before cutting.
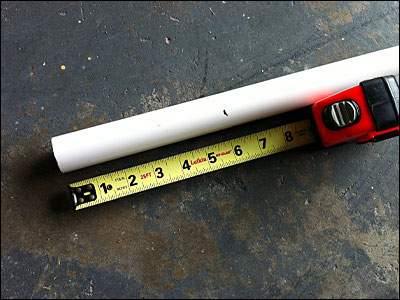
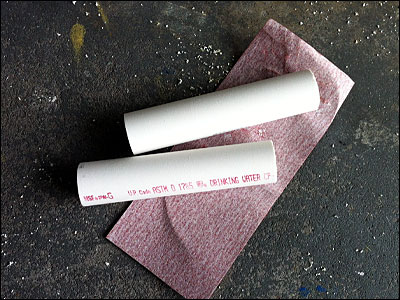
Cut the PVC handles.

Sand the outside and inside edges of the ends of the handles and rough up the outside to improve the grip if you don’t plan to put padded grips on them. If you are putting padded grips on the handles spraying them with hairspray first will help keep the grips in place.
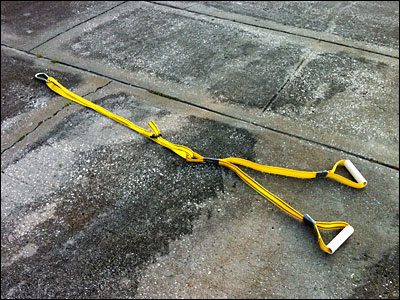
You could simply thread the tie downs through your handles, fasten the buckles, and put the spring clips on, but I think using the buckle to create separate loops for the handles and the rest of the strap looks better than using one big loop and it keeps the handles in one place.
Thread the end of the webbing through the handle then through the middle of the buckle frame…
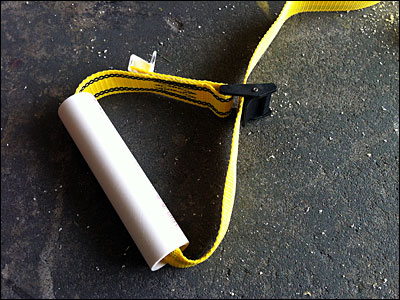
…then back around through the buckle to secure it.
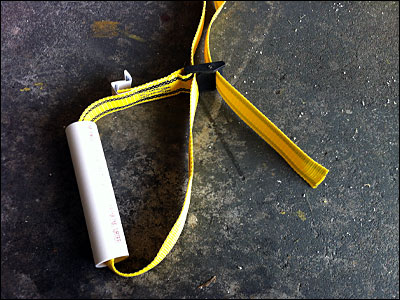
After you do this for both straps, measure off equal lengths from the ends of the webbing and mark them with the sharpie. If you plan to use the straps at different lengths for different exercises, measure and make marks at those lengths for quick reference when making adjustments.
Put the spring clips on if you plan to use them, and you’re set.
While there are other ways to construct these, this is one of the quickest and requires no sewing or additional hardware.
If you have a machine or a heavy duty stitching awl and don’t mind sewing, cut the end with the buckle off one of the straps and thread each end through a handle and sew it into a loop using strong thread, which you can also get at Strap Works. In the example I mocked up with duct tape pictured below I measured off twenty four inches for each loop, and duct taped about the last three inches of the loop together.
Then fold the strap in half creating a loop with the fold, and sew the strap together from about three inches to about six inches from the fold, creating a loop. Thread the other strap through the loop and fasten the buckle. Mark off regular increments on the strap with the sharpie for repeatable positioning if you want. Add a spring clip and you’re all set.
Use
To anchor them to a door frame hang the straps over the top of the door with the clips on the outside of the door frame (the side the door opens towards) as pictured above. If possible, use a door that opens into a room with nobody in it so you don’t have to worry about someone opening the door while you are using them. If not, notify everyone there not to open the door without knocking or place a conspicuous sign on the door alerting people not to open it.
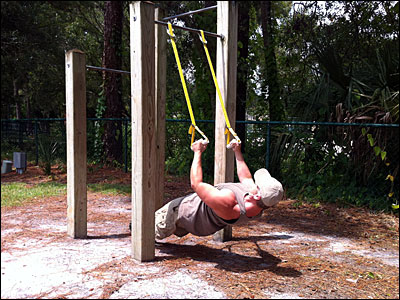
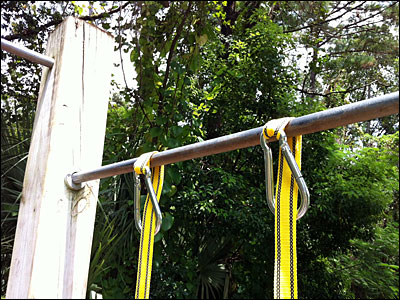
If you plan to use them outdoors you can either clip the ends together and hang them over a high post or strong tree branch, or wrap the strap over a chinning bar, monkey bar, pipe, or beam and fasten the spring clip as pictured below. Make sure the structure will support your weight and doesn’t have any sharp edges which may cut into or damage the straps.
Many public parks have swing sets with eye bolts or similar mounting hardware for the swings which works well for clipping the straps to. Use them between the swings if the spacing is not too wide (more than a little outside shoulder width).
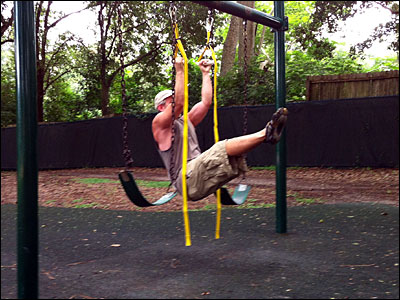
Like barbells, and dumbbells, there are a few really good exercises you can do with suspension trainers, and an almost infinite variety of relatively ineffective and/or dangerous ones (including most of the exercises recommended in the courses and DVD’s sold with commercial suspension trainers). Suspension trainers work best for exercises requiring you to hang most or all of your body weight from your arms like chin ups, pull ups, and inverted rows and curls, and should be used for these when a fixed bar or handles at the appropriate height is not available.
They also work well for exercises like chest flyes (horizontal shoulder adduction), rear delt flyes (horizontal shoulder abduction) and overhead triceps extensions if they are performed with the body positioned more diagonally than horizontally and with wide foot spacing for stability.
Suspension trainers work very poorly for exercises requiring your arms to support most of your body weight like push ups and dips because the additional effort required to maintain balance and correct body positioning reduces your ability to focus on intensely contracting the target muscles.
Contrary to the misinformed claims of so-called “functional training” proponents, this instability and additional balance challenge does not make exercise more effective for strengthening the muscles of the trunk or “core” or translate to improved balance in other movements.
If your goal is to maximize general improvements in muscular strength and size and overall functional ability you should perform push ups, dips, and similar exercises on a stable surface or bars, not on a suspension trainer.
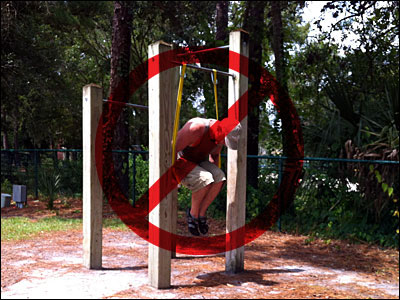
Suspension trainers should not be looped around the feet or ankles to support the legs for similar reasons. Exercises requiring the feet to be supported in an elevated position should be performed using a stable platform or bar, like the roller pad on the UXS bodyweight multi-exercise station.
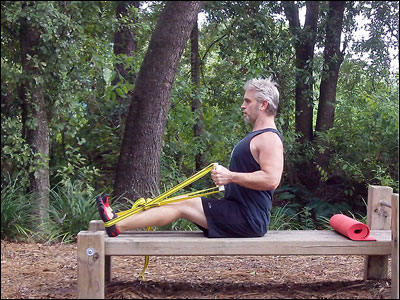
However, suspension trainers can be looped under the feet to anchor them for use during isometric exercises for the upper body like compound rows (pictured below), arm curls, and lateral raises, using timed static contraction protocol. These are discussed in detail in the Project: Kratos bodyweight high intensity training program handbook.
If you’ve been considering buying a suspension trainer for your home workouts or your personal training studio or gym, give this a try before you spend way more than you need to overpriced commercial suspension trainer. If you follow the instructions here you will get something that is just as strong and works just as well for a small fraction of the price.


0 comments:
Post a Comment